
[ad_1]
On this weblog publish, I present you the right way to deploy an answer that makes use of AWS Lambda to routinely handle the lifecycle of Amazon VPC Community Entry Management Listing (ACL) guidelines to mitigate community floods detected utilizing Amazon CloudWatch Logs Insights and Amazon Timestream.
Utility groups ought to contemplate the impression sudden site visitors floods can have on an utility’s availability. Web-facing purposes might be prone to site visitors that some distributed denial of service (DDoS) mitigation techniques can’t detect. For instance, hit-and-run occasions are a preferred strategy that use short-lived floods that reoccur at random intervals. Every burst is sufficiently small to go unnoticed by mitigation techniques, however nonetheless happen typically sufficient and are giant sufficient to be disruptive. Routinely detecting and blocking short-term sources of invalid site visitors, mixed with different greatest practices, can strengthen the resiliency of your purposes and keep buyer belief.
Use resilient architectures
AWS clients can use prescriptive steerage to enhance DDoS resiliency by reviewing the AWS Finest Practices for DDoS Resiliency. It describes a DDoS-resilient reference structure as a information that can assist you defend your utility’s availability.
The most effective practices above tackle the wants of most AWS clients; nonetheless, on this weblog we cowl a number of outlier examples that fall outdoors regular steerage. Listed here are a number of examples which may describe your state of affairs:
It’s good to function performance that isn’t but totally supported by an AWS managed service that takes on the duty of DDoS mitigation.
Migrating to an AWS managed service similar to Amazon Route 53 isn’t instantly potential and also you want an interim resolution that mitigates dangers.
Community ingress have to be allowed from a large public IP area that may’t be restricted.
You’re utilizing public IP addresses assigned from the Amazon pool of public IPv4 addresses (which might’t be protected by AWS Defend) quite than Elastic IP addresses.
The appliance’s know-how stack has restricted or no assist for horizontal scaling to soak up site visitors floods.
Your HTTP workload sits behind a Community Load Balancer and may’t be protected by AWS WAF.
Community floods are disruptive however not vital sufficient (too rare or too low quantity) to be detected by your managed DDoS mitigation techniques.
For these conditions, VPC community ACLs can be utilized to disclaim invalid site visitors. Usually, the restrict on guidelines per community ACL makes them unsuitable for dealing with actually distributed community floods. Nonetheless, they are often efficient at mitigating community floods that aren’t distributed sufficient or giant sufficient to be detected by DDoS mitigation techniques.
Given the dynamic nature of community site visitors and the restricted measurement of community ACLs, it helps to automate the lifecycle of community ACL guidelines. Within the following sections, I present you an answer that makes use of community ACL guidelines to routinely detect and block infrastructure layer site visitors inside 2–5 minutes and routinely removes the principles once they’re not wanted.
Detecting anomalies in community site visitors
You want a solution to block disruptive site visitors whereas not impacting authentic site visitors. Anomaly detection can isolate the suitable site visitors to dam. Each workload is exclusive, so that you want a solution to routinely detect anomalies within the workload’s site visitors sample. You’ll be able to decide what’s regular (a baseline) after which detect statistical anomalies that deviate from the baseline. This baseline can change over time, so it must be calculated based mostly on a rolling window of current exercise.
Z-scores are a standard solution to detect anomalies in time-series information. The method for making a Z-score is to first calculate the common and commonplace deviation (a measure of how a lot the values are unfold out) throughout all values over a span of time. Then for every worth within the time window calculate the Z-score as follows:
Z-score = (worth – common) / commonplace deviation
A Z-score exceeding 3.0 signifies the worth is an outlier that’s larger than 99.7 p.c of all different values.
To calculate the Z-score for detecting community anomalies, you want to set up a time sequence for community site visitors. This resolution makes use of VPC circulate logs to seize details about the IP site visitors in your VPC. Every VPC circulate log report gives a packet rely that’s aggregated over a time interval. Every circulate log report aggregates the variety of packets over an interval of 60 seconds or much less. There isn’t a constant time boundary for every log report. This implies uncooked circulate log information aren’t a predictable solution to construct a time sequence. To handle this, the answer processes circulate logs into packet bins for time sequence values. A packet bin is the variety of packets despatched by a novel supply IP tackle inside a selected time window. A supply IP tackle is taken into account an anomaly if any of its packet bins over the previous hour exceed the Z-score threshold (default is 3.0).
When total site visitors ranges are low, there may be supply IP addresses with a excessive Z-score that aren’t a danger. To mitigate in opposition to false positives, supply IP addresses are solely thought of to be an anomaly if the packet bin exceeds a minimal threshold (default is 12,000 packets).
Let’s assessment the general resolution structure.
Answer overview
This resolution, proven in Determine 1, makes use of VPC circulate logs to seize details about the site visitors reaching the community interfaces in your public subnets. CloudWatch Logs Insights queries are used to summarize the latest IP site visitors into packet bins which can be saved in Timestream. The time sequence desk is queried to establish supply IP addresses accountable for site visitors that meets the anomaly threshold. Anomalous supply IP addresses are revealed to an Amazon Easy Notification Service (Amazon SNS) subject. A Lambda operate receives the SNS message and decides the right way to replace the community ACL.
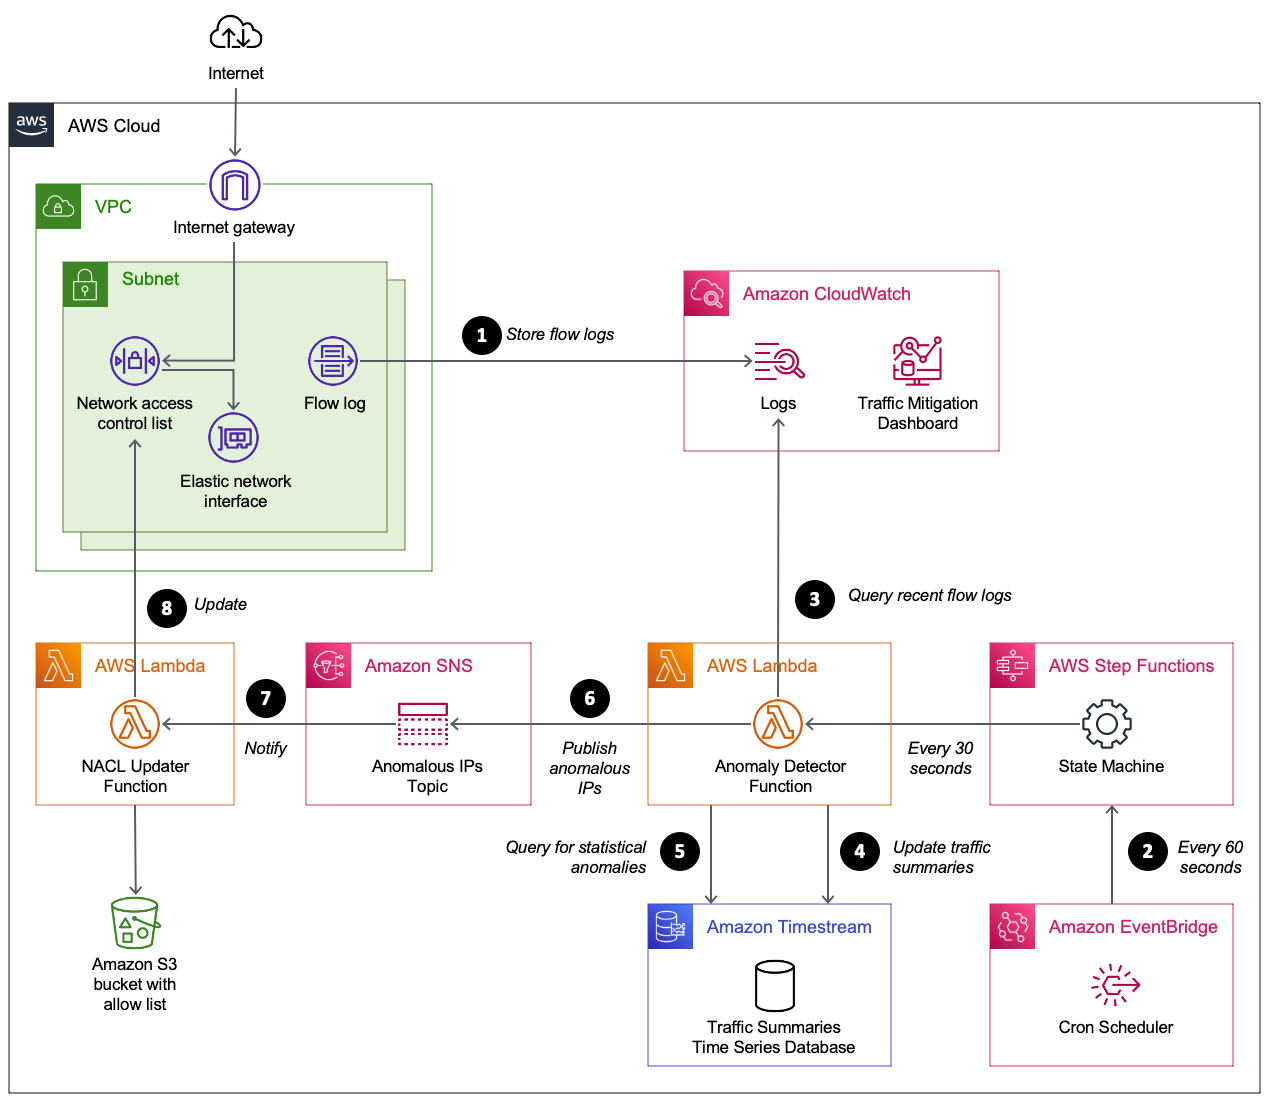
Determine 1: Automating the detection and mitigation of site visitors floods utilizing community ACLs
The way it works
The numbered steps that comply with correspond to the numbers in Determine 1.
Seize VPC circulate logs. Your VPC is configured to stream circulate logs to CloudWatch Logs. To attenuate value, the circulate logs are restricted to specific subnets and solely embody log fields required by the CloudWatch question. When defending an endpoint that spans a number of subnets (similar to a Community Load Balancer utilizing a number of availability zones), every subnet shares the identical community ACL and is configured with a circulate log that shares the identical CloudWatch log group.
Scheduled circulate log evaluation. Amazon EventBridge begins an AWS Step Capabilities state machine on a time interval (60 seconds by default). The state machine begins a Lambda operate instantly, after which once more after 30 seconds. The Lambda operate performs steps 3–6.
Summarize current community site visitors. The Lambda operate runs a CloudWatch Logs Insights question. The question scans the latest circulate logs (5-minute window) to summarize packet frequency grouped by supply IP. These groupings are known as packet bins, the place every bin represents the variety of packets despatched by a supply IP inside a given minute of time.
Replace time sequence database. A time sequence database in Timestream is up to date with the latest packet bins.
Use statistical evaluation to detect abusive supply IPs. A Timestream question is used to carry out a number of calculations. The question calculates the common bin measurement over the previous hour, together with the usual deviation. These two values are then used to calculate the utmost Z-score for all supply IPs over the previous hour. This implies an abusive IP will stay flagged for one hour even when it stopped sending site visitors. Z-scores are sorted in order that essentially the most abusive supply IPs are prioritized. If a supply IP meets these two standards, it’s thought of abusive.
Most Z-score exceeds a threshold (defaults to three.0).
Packet bin exceeds a threshold (defaults to 12,000). This avoids flagging supply IPs during times of total low site visitors when there isn’t a want to dam site visitors.
Publish anomalous supply IPs. Publish a message to an Amazon SNS subject with an inventory of anomalous supply IPs. The operate additionally publishes CloudWatch metrics that can assist you monitor the variety of distinctive and abusive supply IPs over time. At this level, the circulate log summarizer operate has completed its job till the subsequent time it’s invoked from EventBridge.
Obtain anomalous supply IPs. The community ACL updater operate is subscribed to the SNS subject. It receives the listing of anomalous supply IPs.
Replace the community ACL. The community ACL updater operate makes use of two community ACLs known as blue and inexperienced. This verifies that the energetic guidelines stay in place whereas updating the principles within the inactive community ACL. When the inactive community ACL guidelines are up to date, the operate swaps community ACLs on every subnet. By default, every community ACL has a restrict of 20 guidelines. If the variety of anomalous supply IPs exceeds the community ACL restrict, the supply IPs with the best Z-score are prioritized. CloudWatch metrics are offered that can assist you monitor the variety of supply IPs blocked, and what number of supply IPs couldn’t be blocked attributable to community ACL limits.
Conditions
This resolution assumes you will have a number of public subnets used to function an internet-facing endpoint.
Deploy the answer
Observe these steps to deploy and validate the answer.
Obtain the most recent launch from GitHub.
Add the AWS CloudFormation templates and Python code to an S3 bucket.
Collect the knowledge wanted for the CloudFormation template parameters.
Create the CloudFormation stack.
Monitor site visitors mitigation exercise utilizing the CloudWatch dashboard.
Let’s assessment the steps I adopted in my setting.
Step 1. Obtain the most recent launch
I create a brand new listing on my pc named auto-nacl-deploy. I assessment the releases on GitHub and select the most recent model. I obtain auto-nacl.zip into the auto-nacl-deploy listing. Now it’s time to stage this code in Amazon Easy Storage Service (Amazon S3).
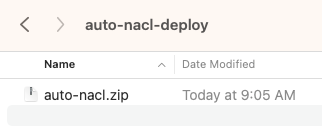
Determine 2: Save auto-nacl.zip to the auto-nacl-deploy listing
Step 2. Add the CloudFormation templates and Python code to an S3 bucket
I extract the auto-nacl.zip file into my auto-nacl-deploy listing.
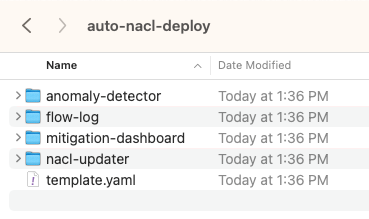
Determine 3: Broaden auto-nacl.zip into the auto-nacl-deploy listing
The template.yaml file is used to create a CloudFormation stack with 4 nested stacks. You copy all recordsdata to an S3 bucket previous to creating the stacks.
To stage these recordsdata in Amazon S3, use an current bucket or create a brand new one. For this instance, I used an current S3 bucket named auto-nacl-us-east-1. Utilizing the Amazon S3 console, I created a folder named artifacts after which uploaded the extracted recordsdata to it. My bucket now appears like Determine 4.
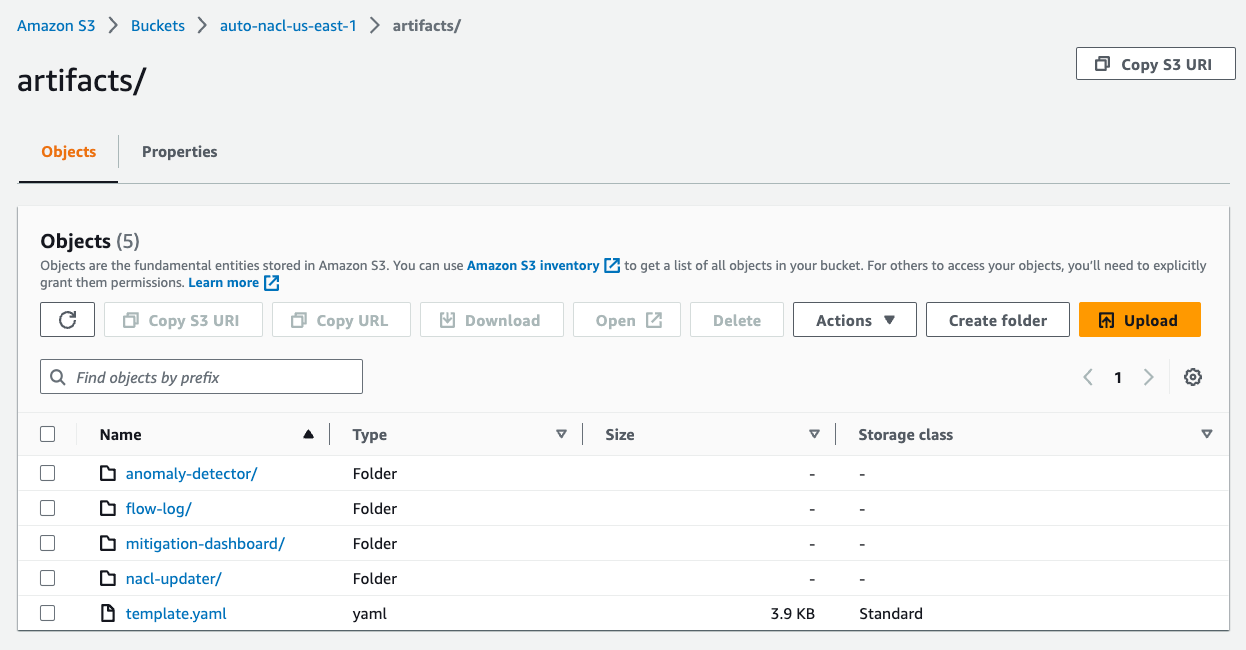
Determine 4: Add the extracted recordsdata to Amazon S3
Step 3. Collect data wanted for the CloudFormation template parameters
There are six parameters required by the CloudFormation template.
Template parameter
Parameter description
VpcId
The ID of the VPC that runs your utility.
SubnetIds
A comma-delimited listing of public subnet IDs utilized by your endpoint.
ListenerPort
The IP port quantity on your endpoint’s listener.
ListenerProtocol
The Web Protocol (TCP or UDP) utilized by your endpoint.
SourceCodeS3Bucket
The S3 bucket that comprises the recordsdata you uploaded in Step 2. This bucket have to be in the identical AWS Area because the CloudFormation stack.
SourceCodeS3Prefix
The S3 prefix (folder) of the recordsdata you uploaded in Step 2.
For the VpcId parameter, I take advantage of the VPC console to search out the VPC ID for my utility.
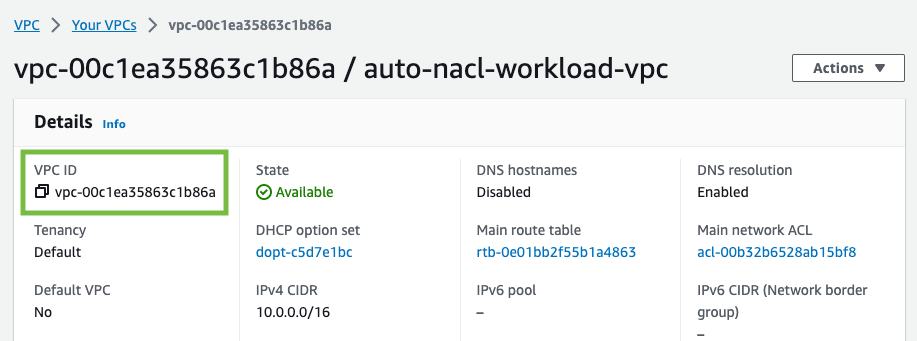
Determine 5: Discover the VPC ID
For the SubnetIds parameter, I take advantage of the VPC console to search out the subnet IDs for my utility. My VPC has private and non-private subnets. For this resolution, you solely want the general public subnets.
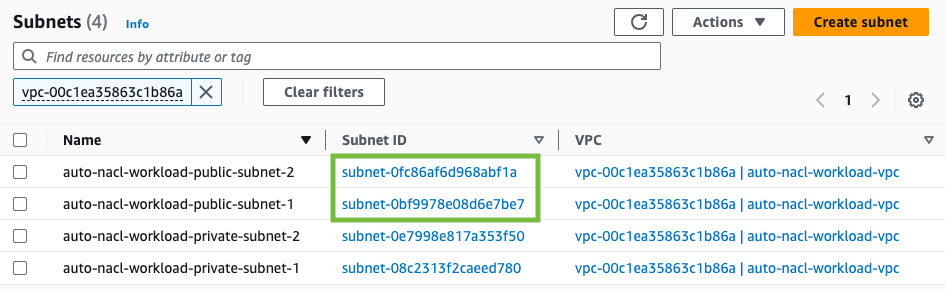
Determine 6: Discover the subnet IDs
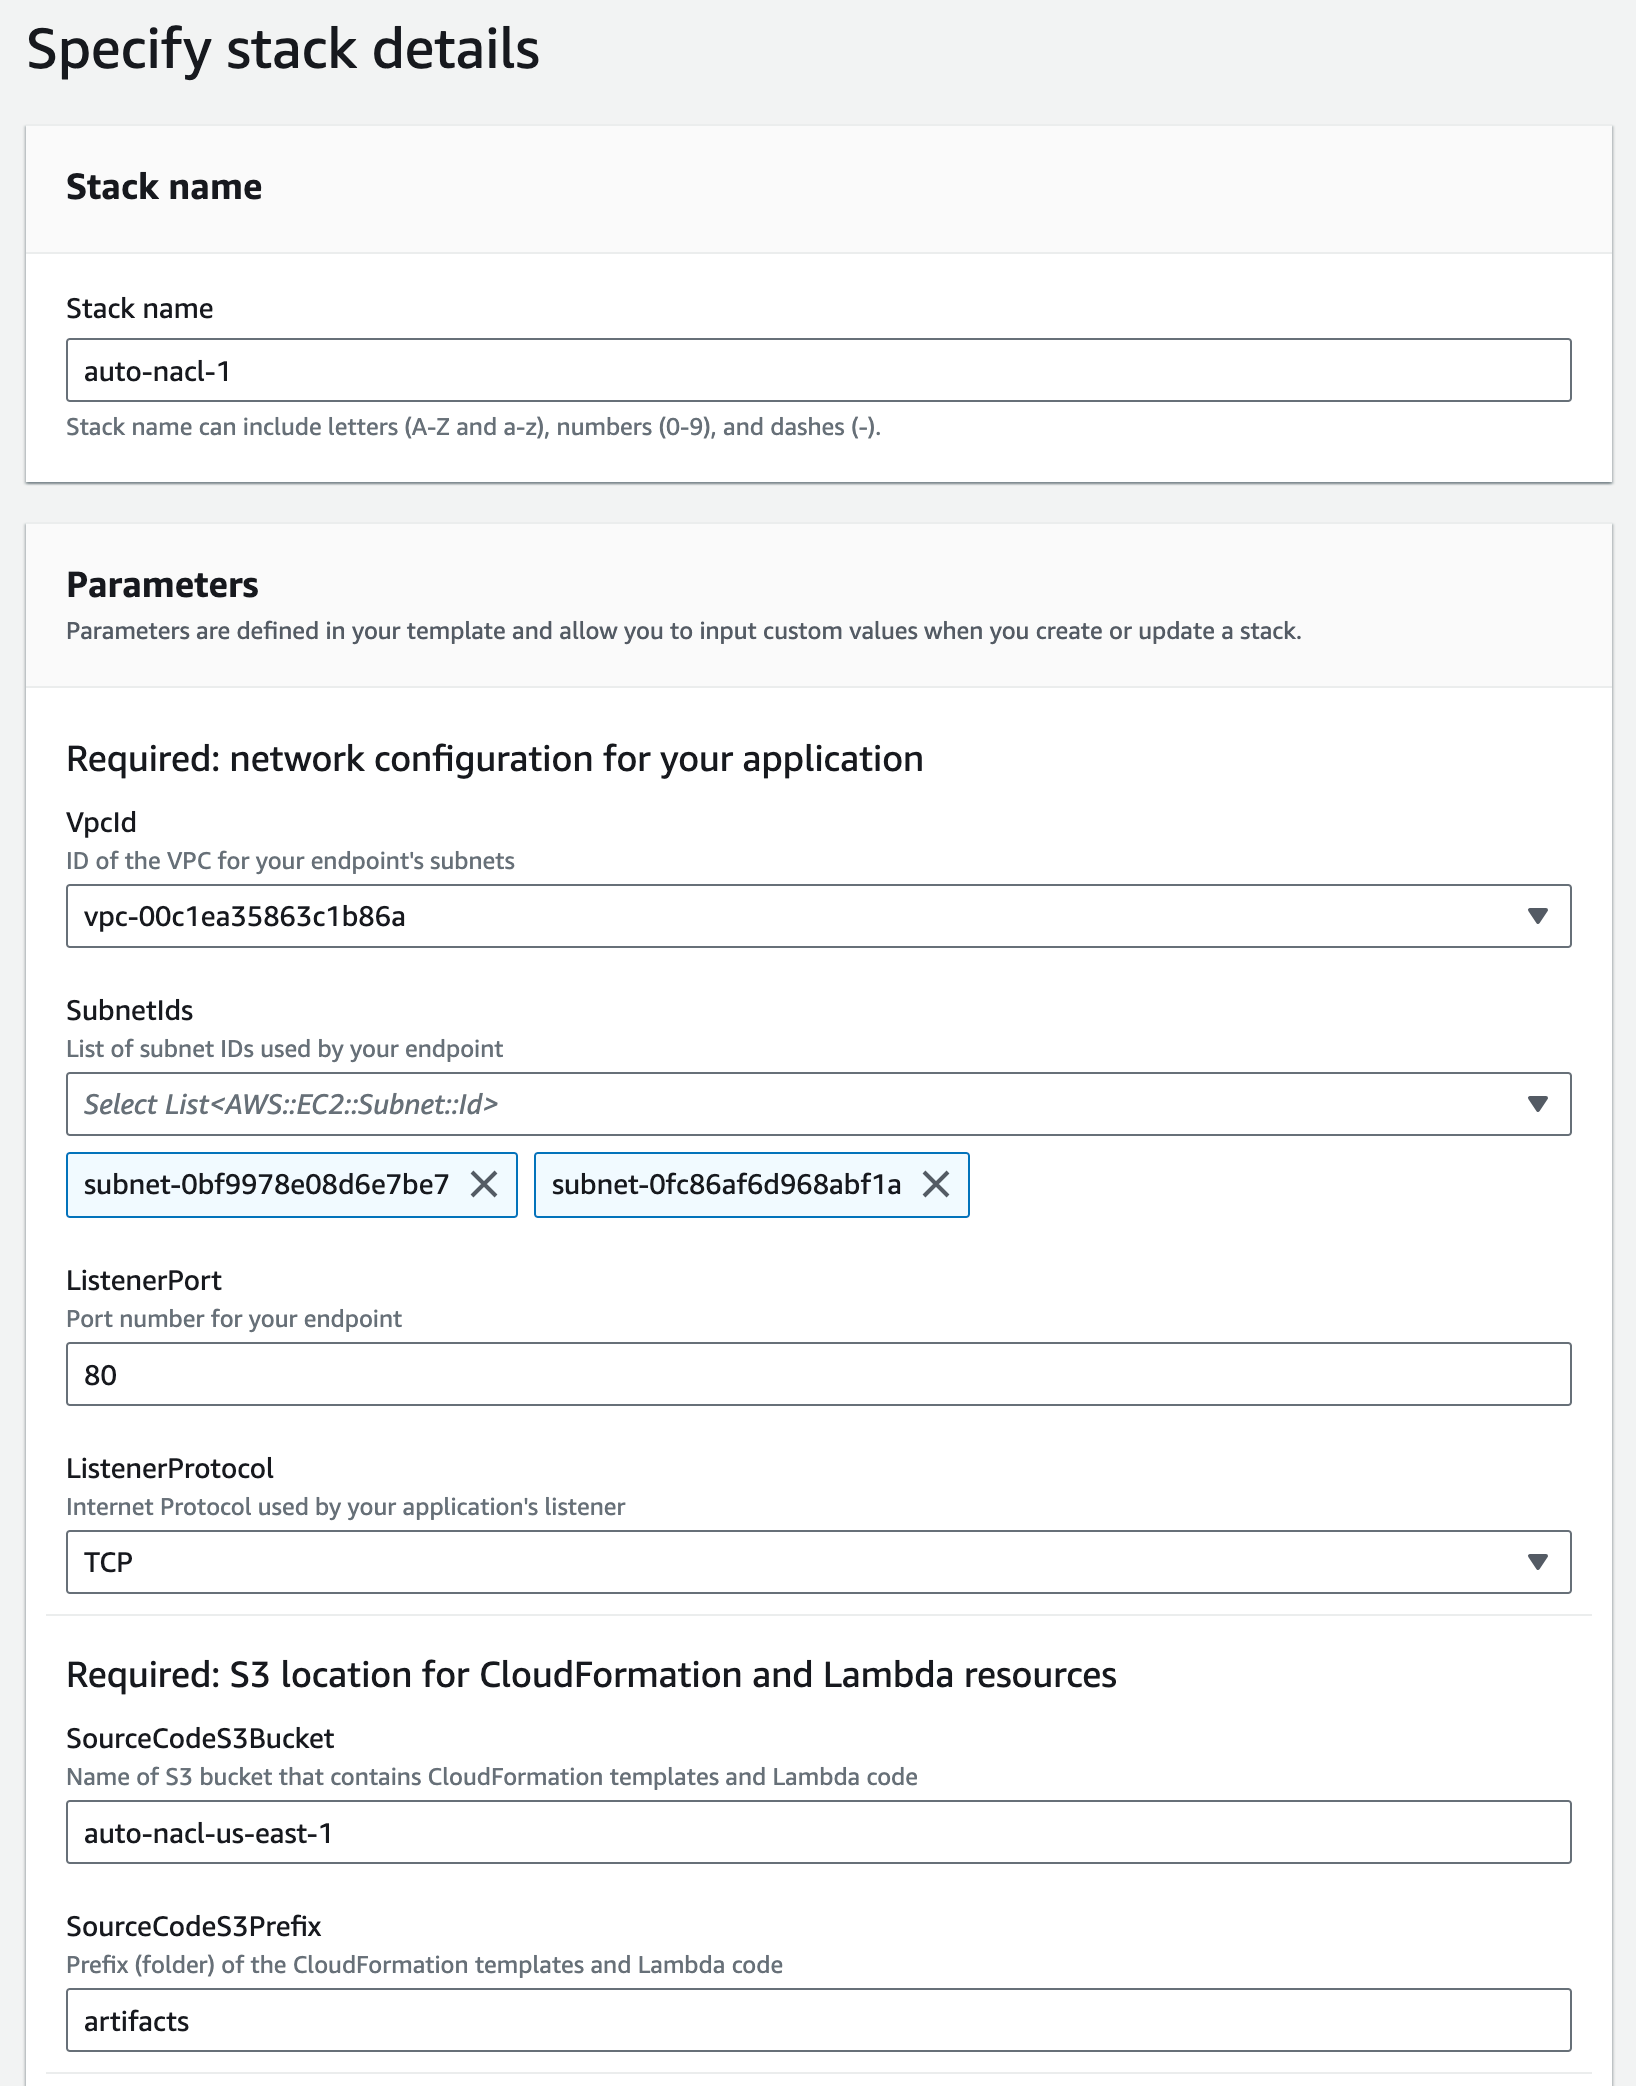
My utility makes use of a Community Load Balancer that listens on port 80 to deal with TCP site visitors. I take advantage of 80 for ListenerPort and TCP for ListenerProtocol.
The following two parameters are based mostly on the Amazon S3 location I used earlier. I take advantage of auto-nacl-us-east-1 for SourceCodeS3Bucket and artifacts for SourceCodeS3Prefix.
Step 4. Create the CloudFormation stack
I take advantage of the CloudFormation console to create a stack. The Amazon S3 URL format is https://<bucket>.s3.<area>.amazonaws.com/<prefix>/template.yaml. I enter the Amazon S3 URL for my setting, then select Subsequent.
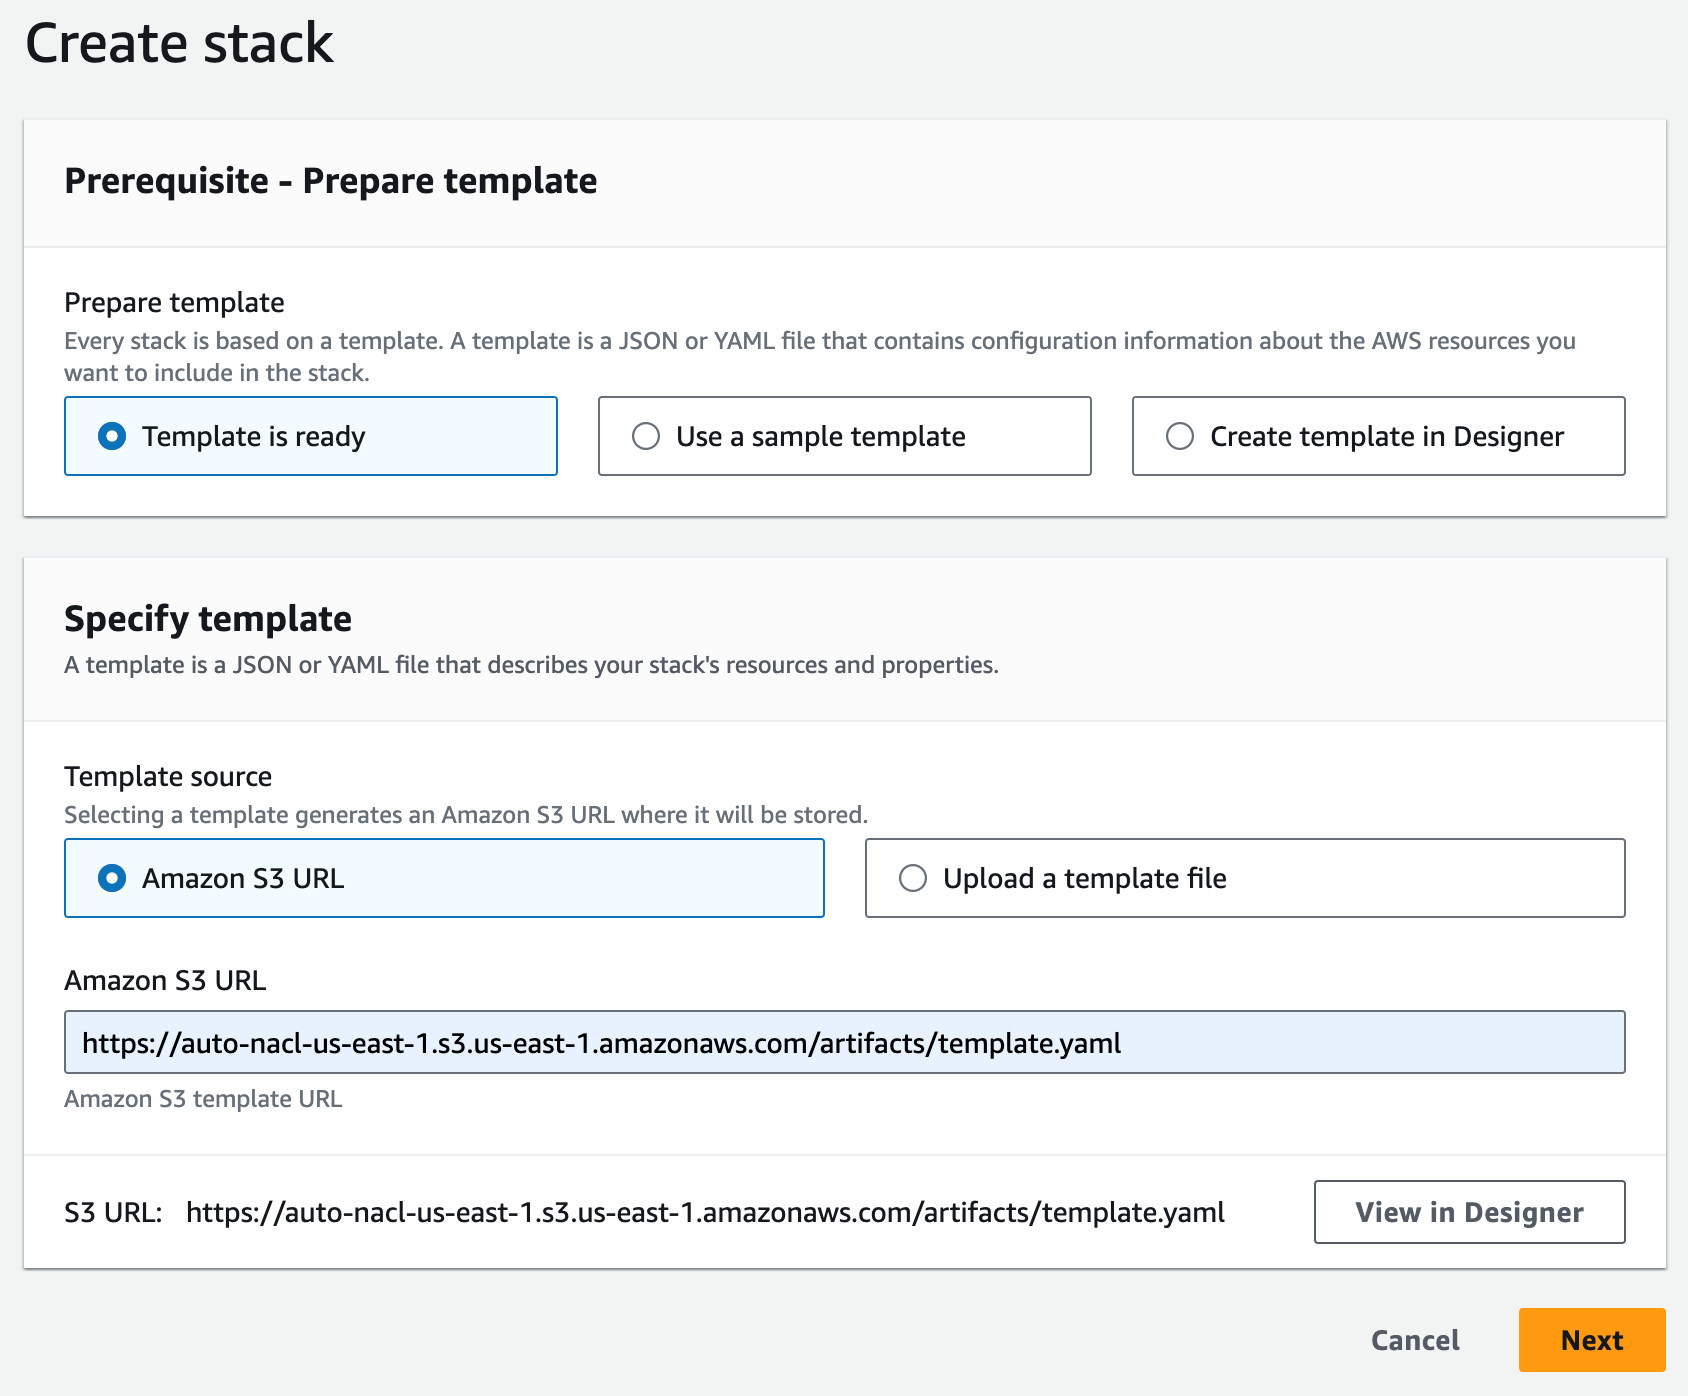
Determine 7: Specify the CloudFormation template
I enter a reputation for my stack (for instance, auto-nacl-1) together with the parameter values I gathered in Step 3. I depart all optionally available parameters as they’re, then select Subsequent.
Determine 8: Present the required parameters
I assessment the stack choices, then scroll to the underside and select Subsequent.
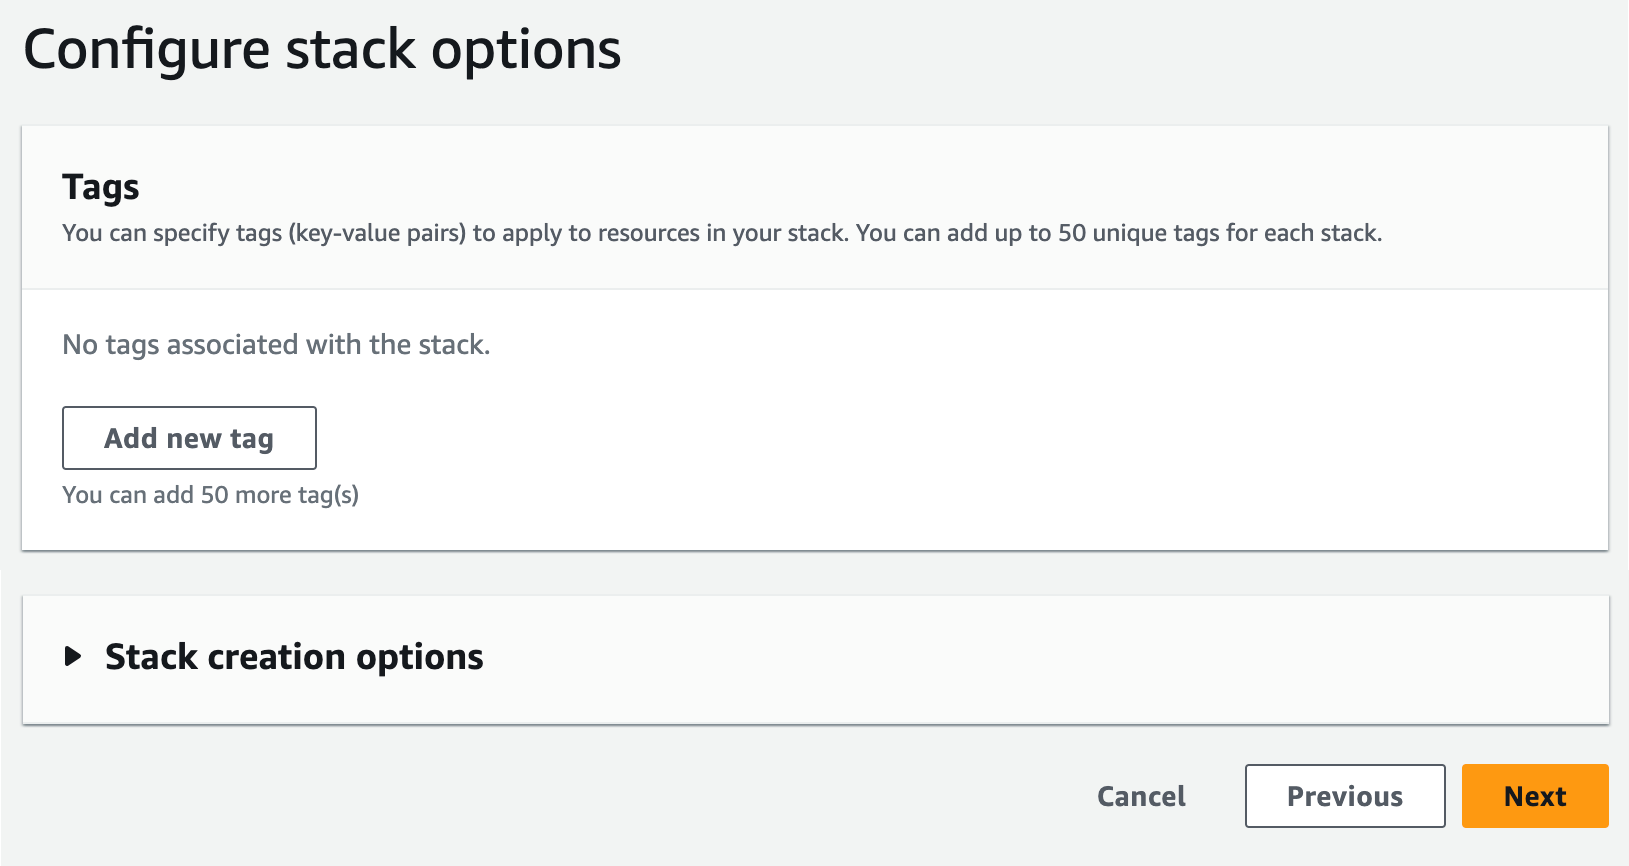
Determine 9: Overview the default stack choices
I scroll right down to the Capabilities part and acknowledge the capabilities required by CloudFormation, then select Submit.
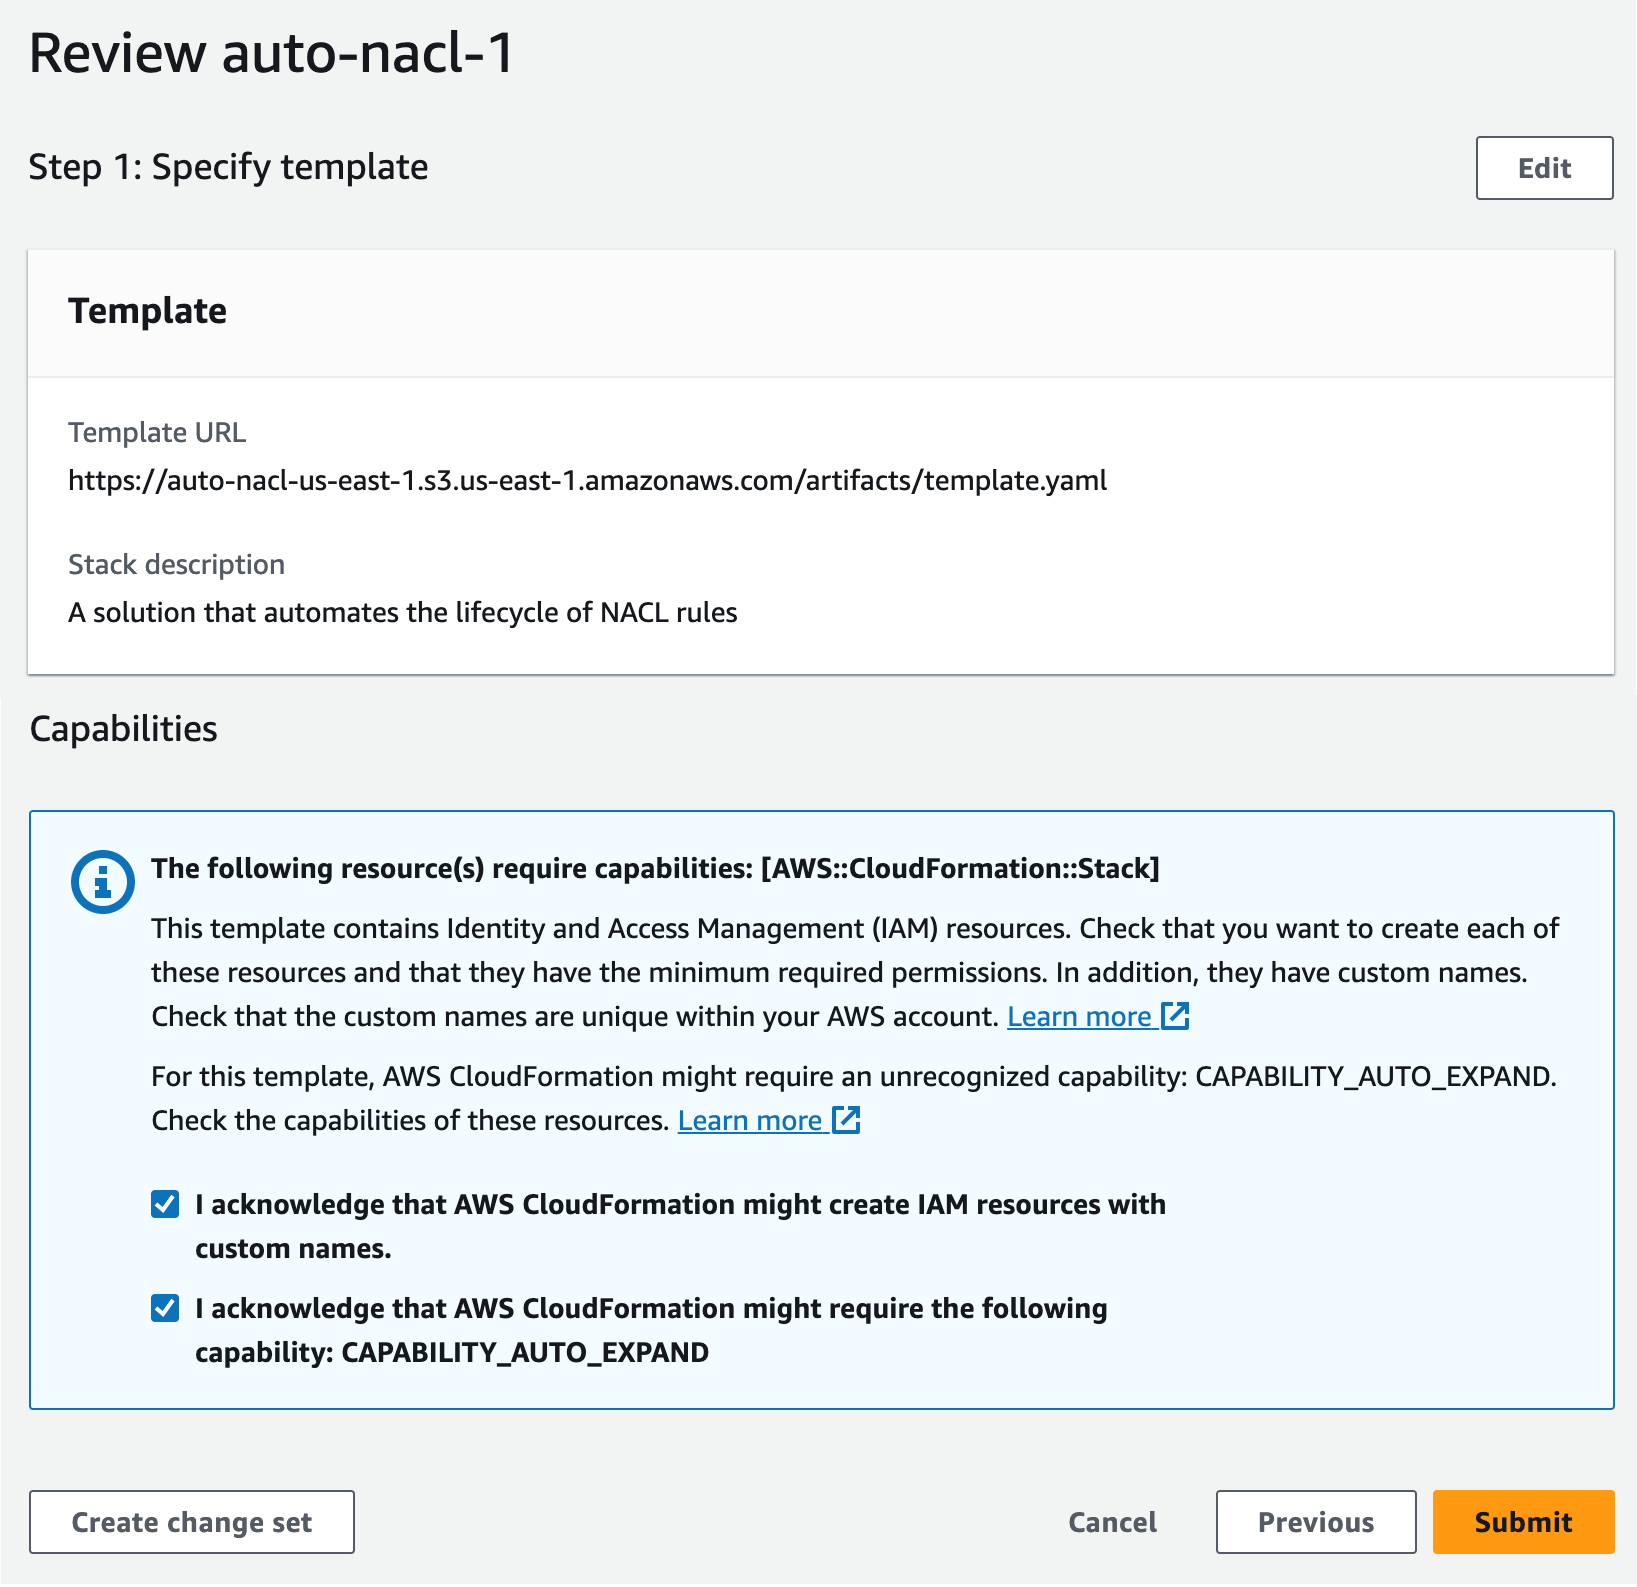
Determine 10: Acknowledge the capabilities required by CloudFormation
I await the stack to achieve CREATE_COMPLETE standing. It takes 10–quarter-hour to create the entire nested stacks.
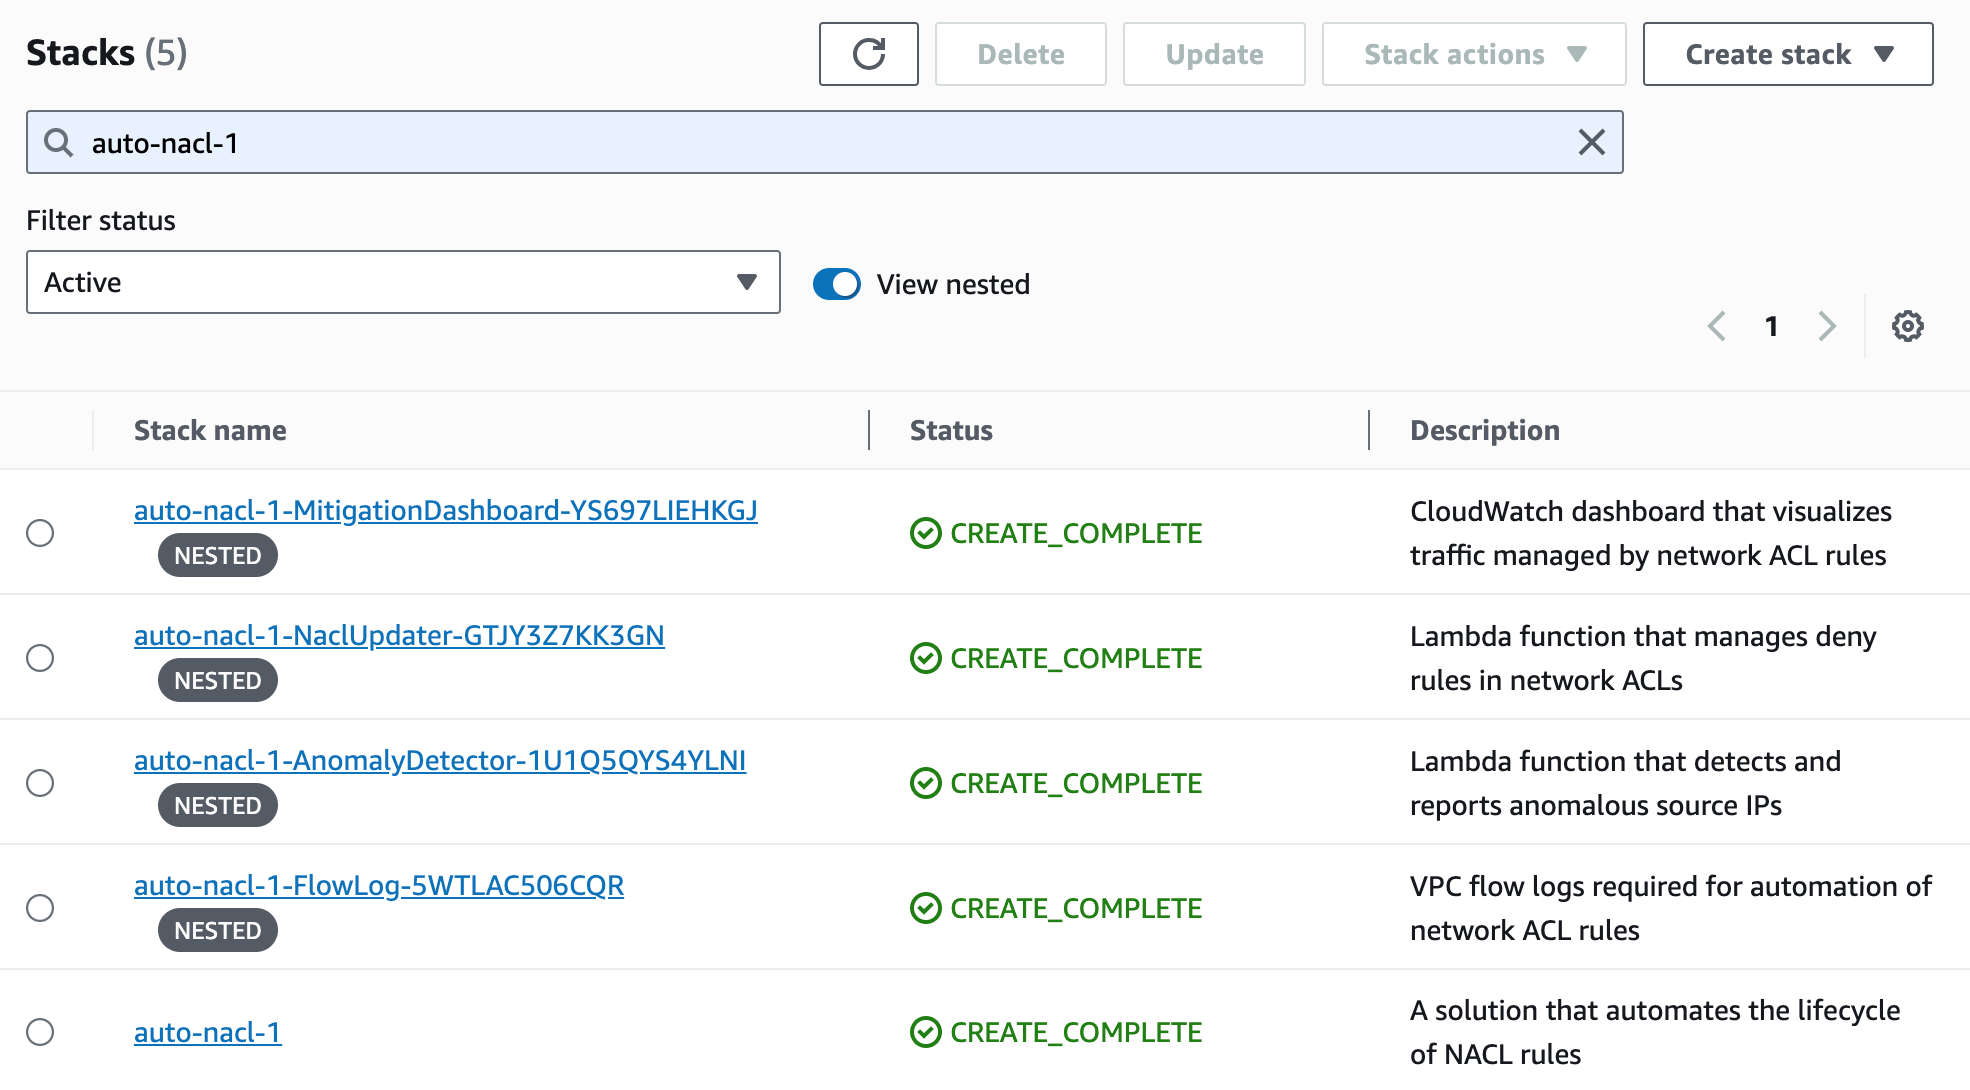
Determine 11: Look forward to the stacks to finish
Step 5. Monitor site visitors mitigation exercise utilizing the CloudWatch dashboard
After the CloudFormation stacks are full, I navigate to the CloudWatch console to open the dashboard. In my setting, the dashboard is called auto-nacl-1-MitigationDashboard-YS697LIEHKGJ.
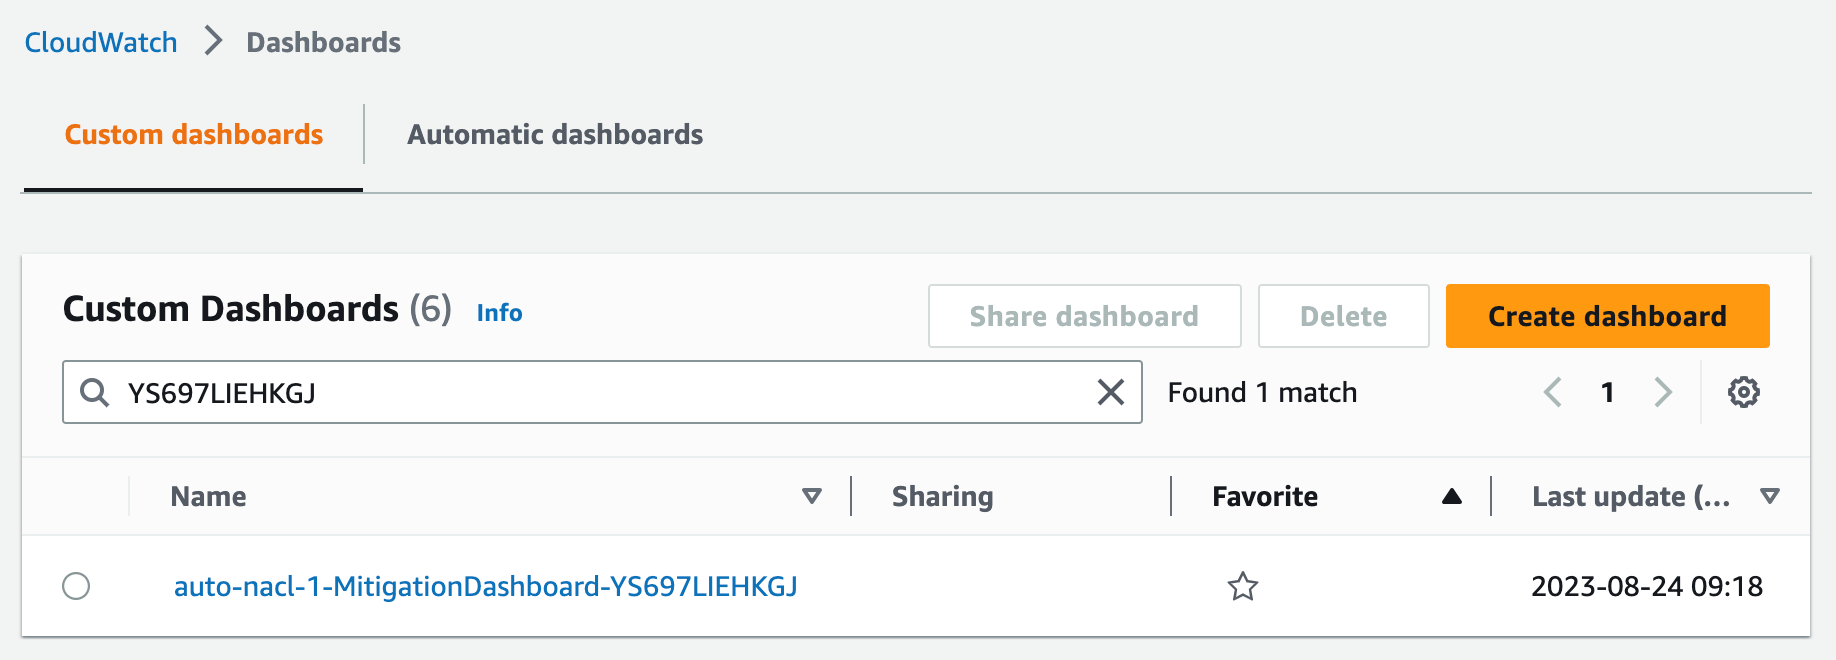
Determine 12: Discover the CloudWatch dashboard
Initially, the dashboard, proven in Determine 13, has little data to show. After an hour, I can see the next metrics from my pattern setting:
The Community Visitors graph exhibits what number of packets are allowed and rejected by community ACL guidelines. No anomalies have been detected but, so this solely exhibits allowed site visitors.
The All Supply IPs graph exhibits what number of whole distinctive supply IP addresses are sending site visitors.
The Anomalous Supply Networks graph exhibits what number of anomalous supply networks are being blocked by community ACL guidelines (or not blocked attributable to community ACL rule restrict). This graph is clean until anomalies have been detected within the final hour.
The Anomalous Supply IPs graph exhibits what number of anomalous supply IP addresses are being blocked (or not blocked) by community ACL guidelines. This graph is clean until anomalies have been detected within the final hour.
The Packet Statistics graph can assist you establish if the sensitivity ought to be adjusted. This graph exhibits the common packets-per-minute and the related commonplace deviation over the previous hour. It additionally exhibits the anomaly threshold, which represents the minimal variety of packets-per-minute for a supply IP tackle to be thought of an anomaly. The anomaly threshold is calculated based mostly on the CloudFormation parameter MinZScore.
anomaly threshold = (MinZScore * commonplace deviation) + common
Growing the MinZScore parameter raises the brink and reduces sensitivity. You may as well modify the CloudFormation parameter MinPacketsPerBin to mitigate in opposition to blocking site visitors during times of low quantity, even when a supply IP tackle exceeds the minimal Z-score.
The Blocked IPs grid exhibits which supply IP addresses are being blocked throughout every hour, together with the corresponding packet bin measurement and Z-score. This grid is clean until anomalies have been detected within the final hour.
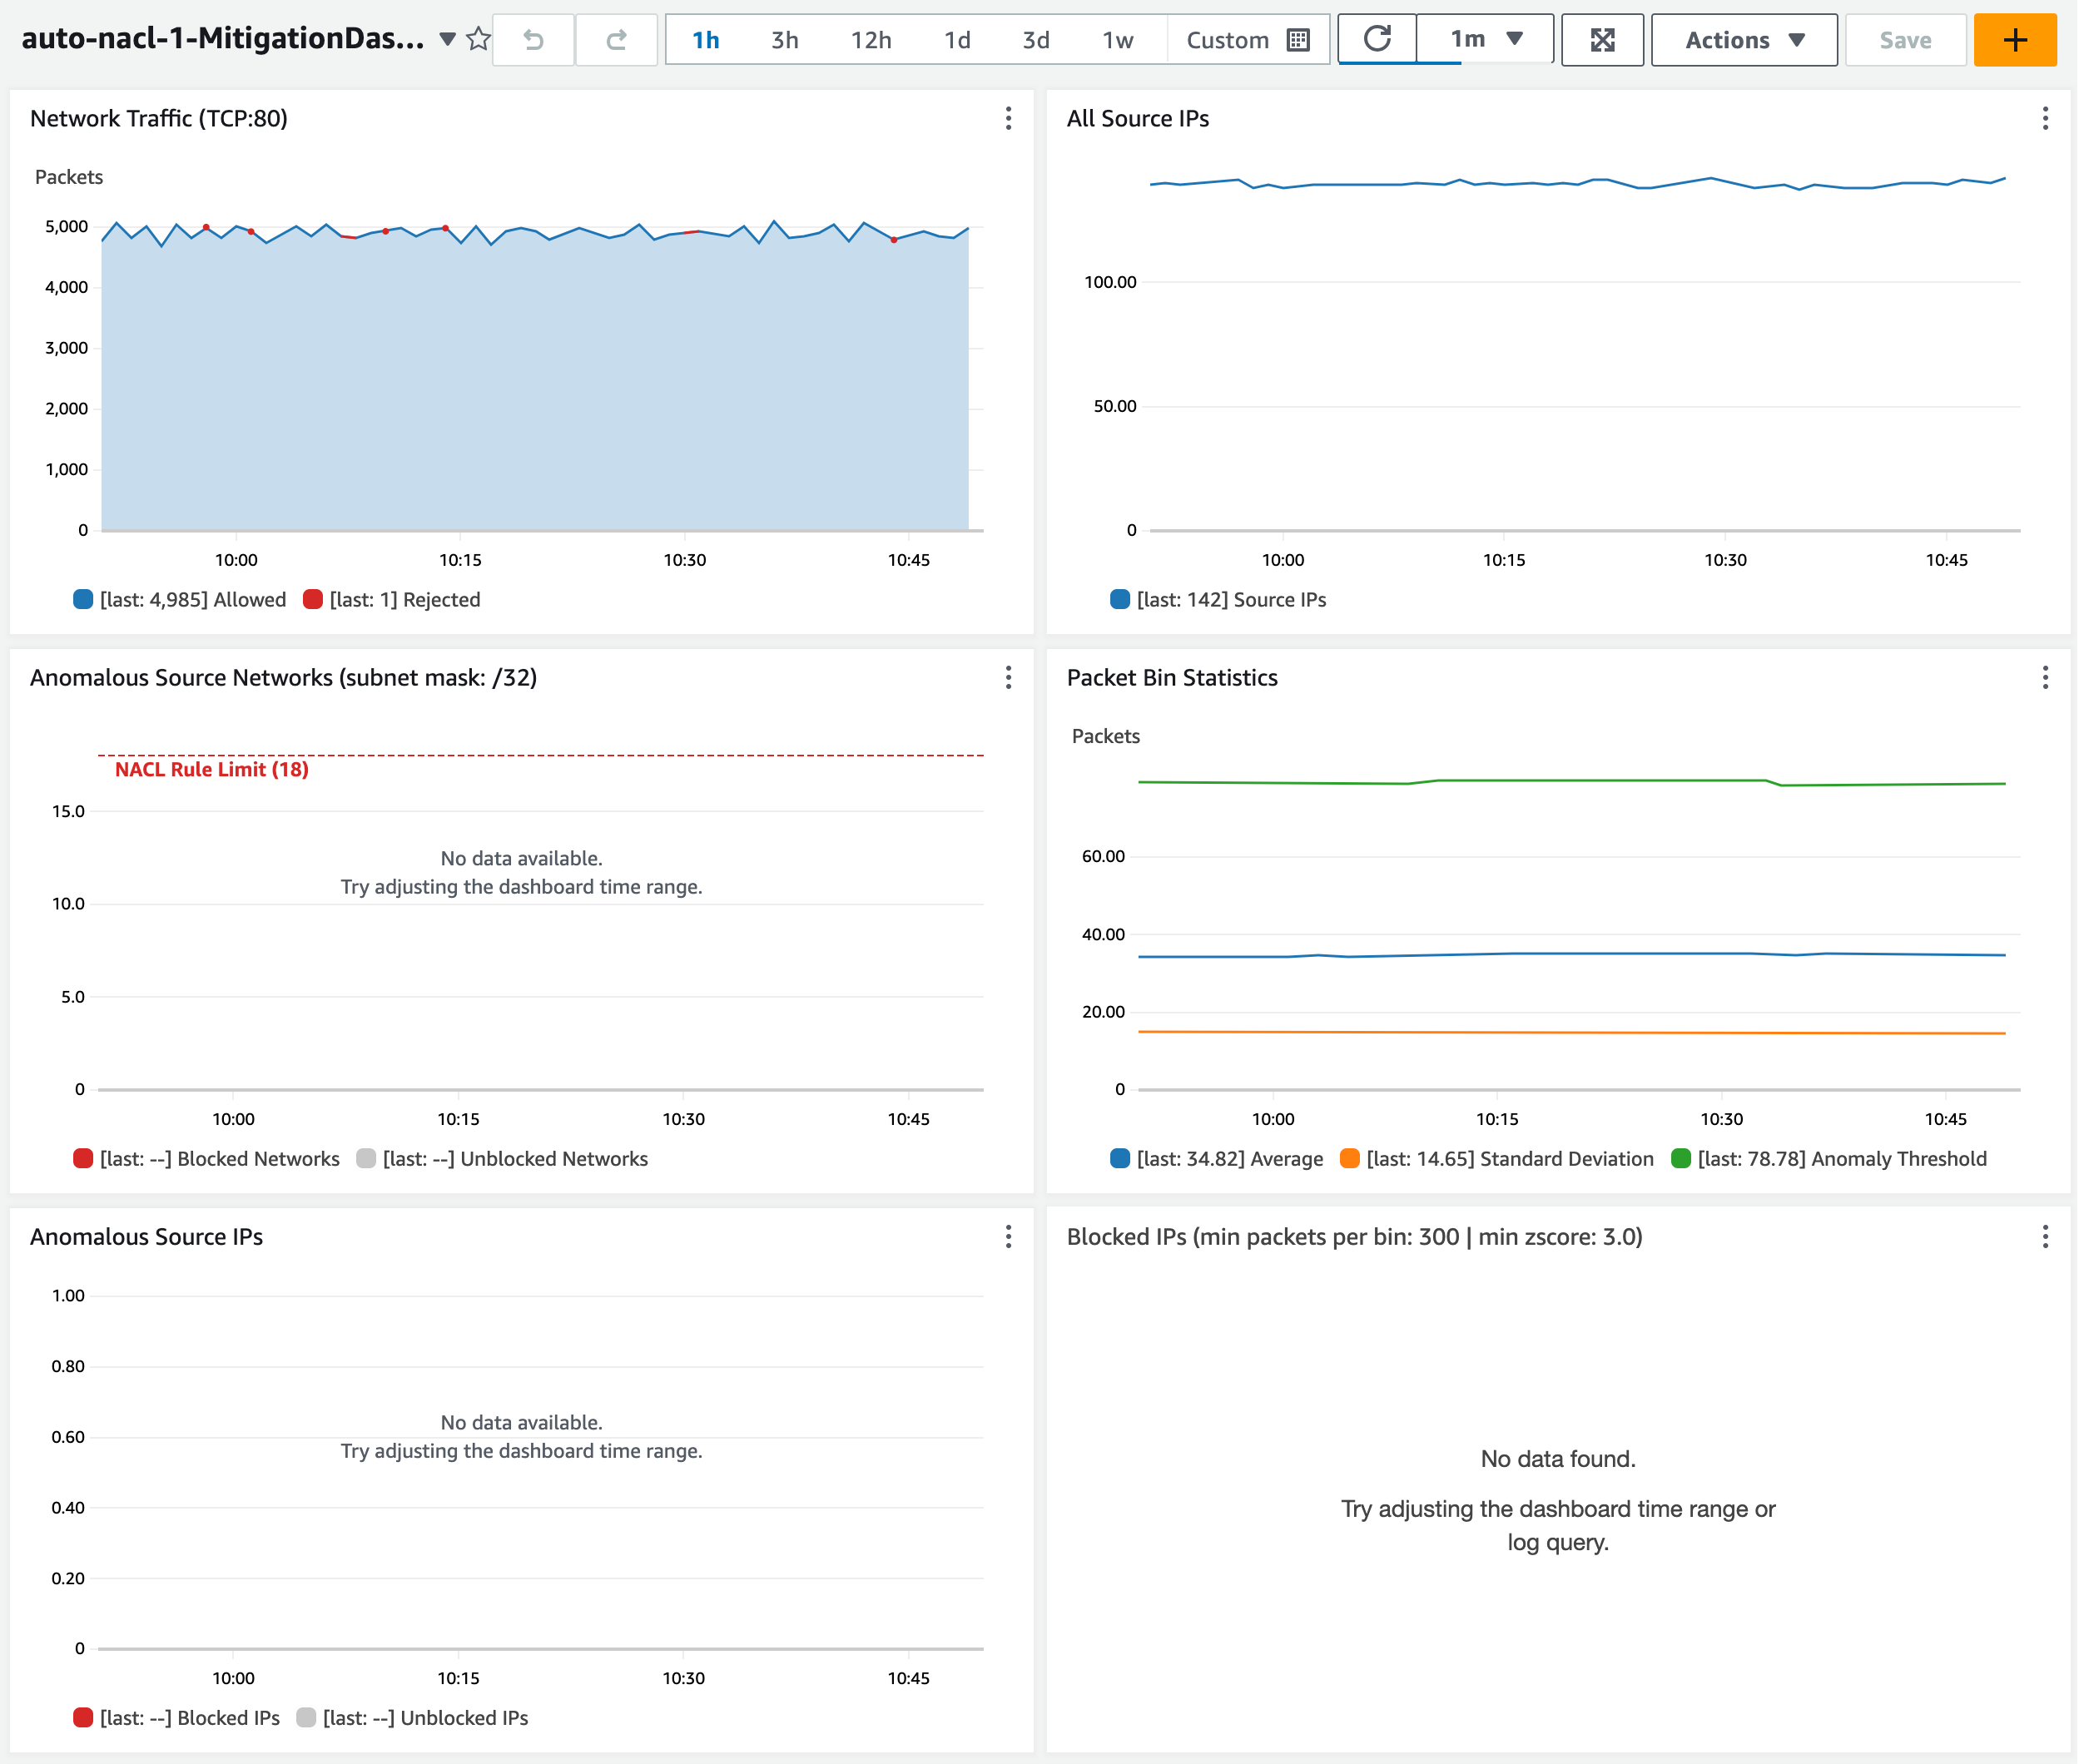
Determine 13: Observe the dashboard after one hour
Let’s assessment a situation to see what occurs when my endpoint sees two waves of anomalous site visitors.
By default, my community ACL permits a most of 20 inbound guidelines. The 2 default guidelines rely towards this restrict, so I solely have room for 18 extra inbound guidelines. My utility sees a spike of community site visitors from 20 distinctive supply IP addresses. When the site visitors spike begins, the anomaly is detected in lower than 5 minutes. Community ACL guidelines are created to dam the highest 18 supply IP addresses (sorted by Z-score). Visitors is blocked for about 5 minutes till the flood subsides. The foundations stay in place for 1 hour by default. When the identical 20 supply IP addresses ship one other site visitors flood a couple of minutes later, most site visitors is straight away blocked. Some site visitors continues to be allowed from two supply IP addresses that may’t be blocked as a result of restrict of 18 guidelines.
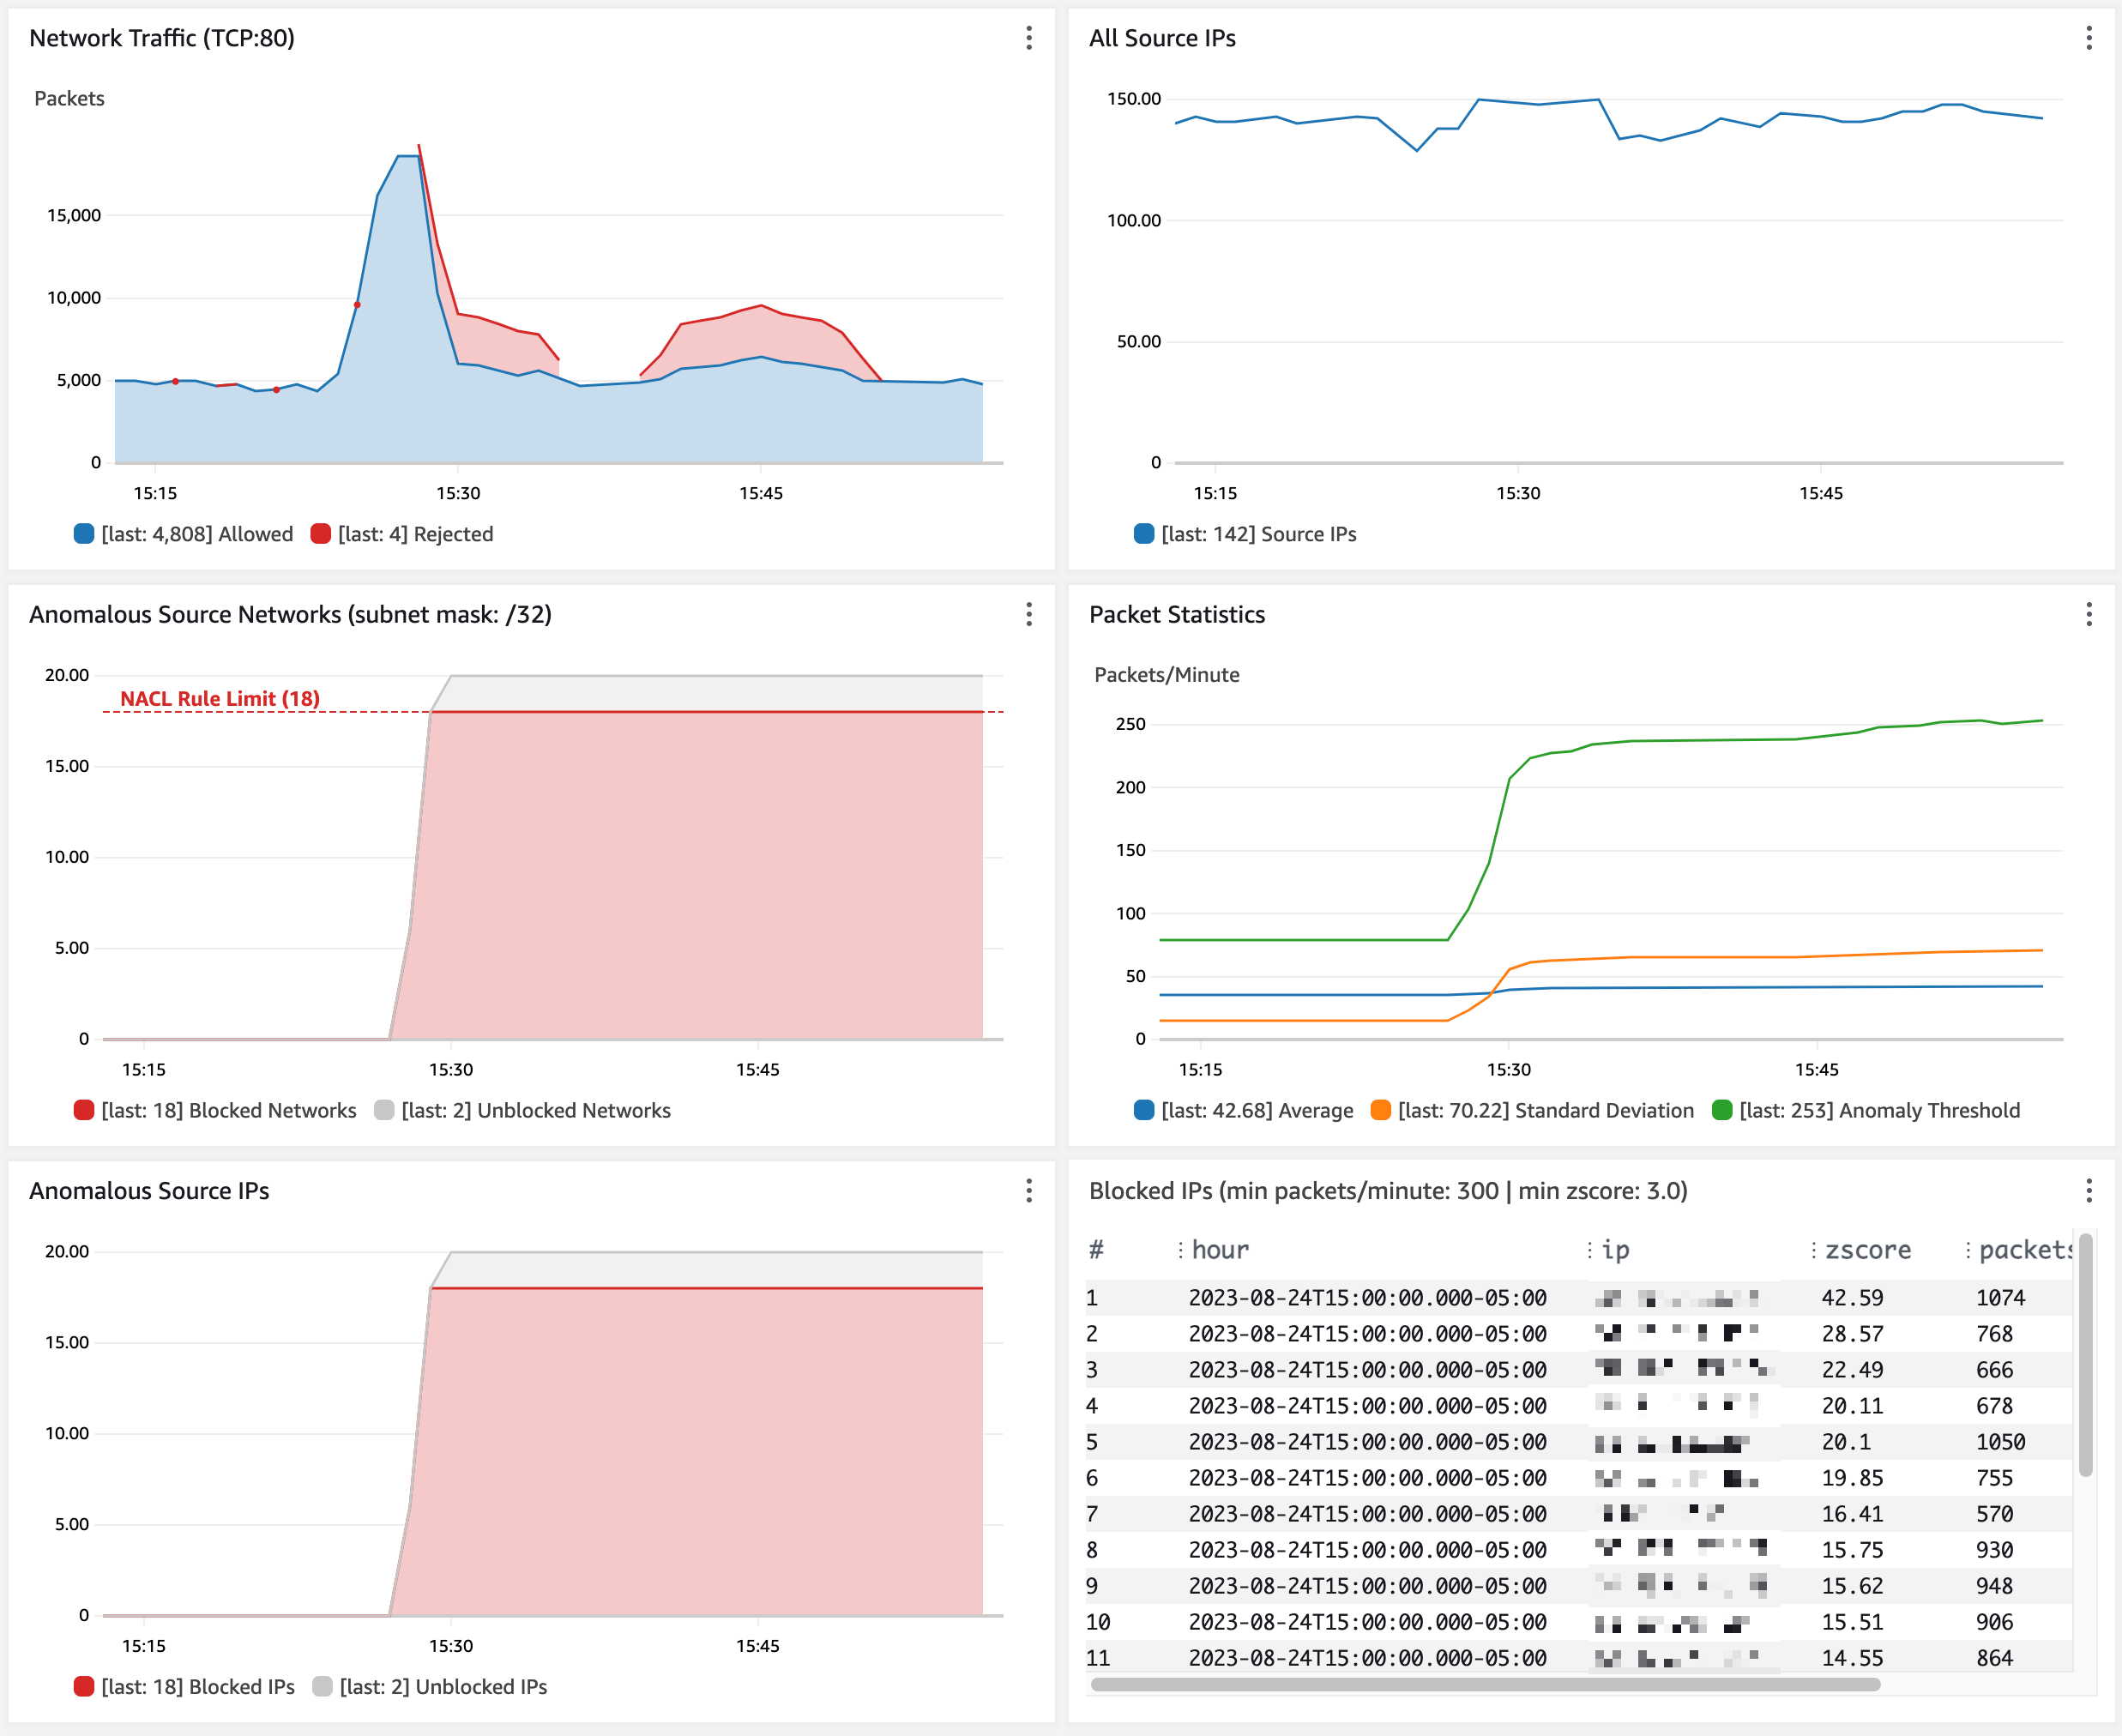
Determine 14: Observe site visitors blocked from anomalous supply IP addresses
Customise the answer
You’ll be able to customise the habits of this resolution to suit your use case.
Block many IP addresses per community ACL rule. To allow blocking extra supply IP addresses than your community ACL rule restrict, change the CloudFormation parameter NaclRuleNetworkMask (default is 32). This units the community masks utilized in community ACL guidelines and allows you to block IP tackle ranges as an alternative of particular person IP addresses. By default, the IP tackle 192.0.2.1 is blocked by a community ACL rule for 192.0.2.1/32. Setting this parameter to 24 leads to a community ACL rule that blocks 192.0.2.0/24. As a reminder, tackle ranges which can be too huge may end in blocking authentic site visitors.
Solely block supply IPs that exceed a packet quantity threshold. Use the CloudFormation parameter MinPacketsPerBin (default is 12,000) to set the minimal packets per minute. This mitigates in opposition to blocking supply IPs (even when their Z-score is excessive) during times of total low site visitors when there isn’t a want to dam site visitors.
Modify the sensitivity of anomaly detection. Use the CloudFormation parameter MinZScore to set the minimal Z-score for a supply IP to be thought of an anomaly. The default is 3.0, which solely blocks supply IPs with packet quantity that exceeds 99.7 p.c of all different supply IPs.
Exclude trusted supply IPs from anomaly detection. Specify an enable listing object in Amazon S3 that comprises an inventory of IP addresses or CIDRs that you just wish to exclude from community ACL guidelines. The community ACL updater operate reads the enable listing each time it handles an SNS message.
Limitations
As coated within the previous sections, this resolution has a number of limitations to concentrate on:
CloudWatch Logs queries can solely return as much as 10,000 information. This implies the site visitors baseline can solely be calculated based mostly on the statement of 10,000 distinctive supply IP addresses per minute.
The site visitors baseline is predicated on a rolling 1-hour window. You may want to extend this if a 1-hour window leads to a baseline that enables false positives. For instance, you may want an extended baseline window in case your service usually handles abrupt spikes that happen hourly or every day.
By default, a community ACL can solely maintain 20 inbound guidelines. This consists of the default enable and deny guidelines, so there’s room for 18 deny guidelines. You’ll be able to enhance this restrict from 20 to 40 with a assist case; nonetheless, it signifies that a most of 18 (or 38) supply IP addresses might be blocked at one time.
The pace of anomaly detection relies on how rapidly VPC circulate logs are delivered to CloudWatch. This often takes 2–4 minutes however can take over 6 minutes.
Price concerns
CloudWatch Logs Insights queries are the primary aspect of value for this resolution. See CloudWatch pricing for extra data. The associated fee is about 7.70 USD per GB of circulate logs generated monthly.
To optimize the price of CloudWatch queries, the VPC circulate log report format solely consists of the fields required for anomaly detection. The CloudWatch log group is configured with a retention of 1 day. You’ll be able to tune your value by adjusting the anomaly detector operate to run much less steadily (the default is twice per minute). The tradeoff is that the community ACL guidelines received’t be up to date as steadily. This may result in the answer taking longer to mitigate a site visitors flood.
Conclusion
Sustaining excessive availability and responsiveness is vital to holding the belief of your clients. The answer described above can assist you routinely mitigate a wide range of community floods that may impression the supply of your utility even when you’ve adopted all of the relevant greatest practices for DDoS resiliency. There are limitations to this resolution, however it will probably rapidly detect and mitigate disruptive sources of site visitors in a cheap method. Your suggestions is vital. You’ll be able to share feedback under and report points on GitHub.
When you’ve got suggestions about this publish, submit feedback within the Feedback part under.
Need extra AWS Safety information? Observe us on Twitter.

Bryan Van Hook
Bryan is a Senior Safety Options Architect at AWS. He has over 25 years of expertise in software program engineering, cloud operations, and web safety. He spends most of his time serving to clients achieve essentially the most worth from native AWS safety providers. Exterior of his day job, Bryan might be discovered enjoying tabletop video games and acoustic guitar.
[ad_2]
Source link


